F1 MANAGER 2024 GUIDE
Updated to 1.11 version (Season 2025 stats)
By "Giok 90" Giovanni Di Mare
Introduction
F1 Manager 2024 places you in control of one of ten existing F1 teams and give you, for the first time in the series, the possibility to create your own F1 team to lead them to glory in the Driver’s Championship and the Constructor’s Championship.
As Team Principal you manage your team under all aspects through the seasons. Every season is made up by 24 Grands Prix composed by Practice, Qualifying, Race and, when planned, Sprint Races.
To reach your goal, you will manage the staff, the drivers and the affiliates, choosing new ones for each of them if you desire. Affiliates have the role of tester with the new peculiarity that they continue to race in F2 or F3 even under contract by your team (if they are already in F2 or F3). A new mentality system has been implemented. You develop your team trough facilities upgrades and choosing which stats improve of your Staff and Drivers. The key aspect will be the development and research projects of your car ensuring you stay ahead of the competition. The manufacture of car parts will also be very important to maintain competitive the car staying under the cost cap. Another important goal is satisfying the board reaching the objectives that give you as reward high expectations with a higher budget. To improve your budget there will be a new system of sponsor with multiple choices. During the GP your choices and strategies will be determinant to finalize your investments and give you the chance to be the new F1 World Champion!
Contents of the Guide
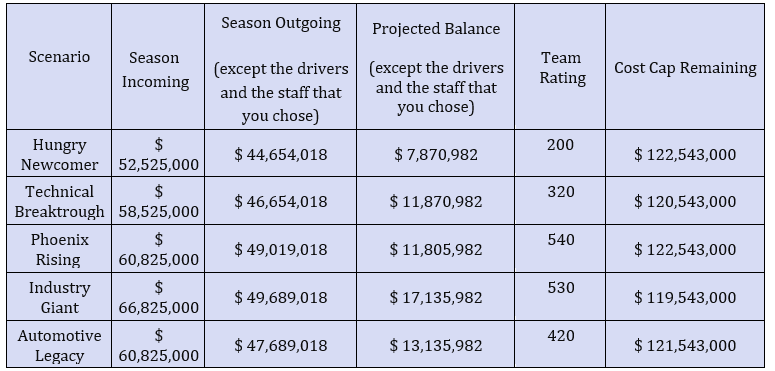
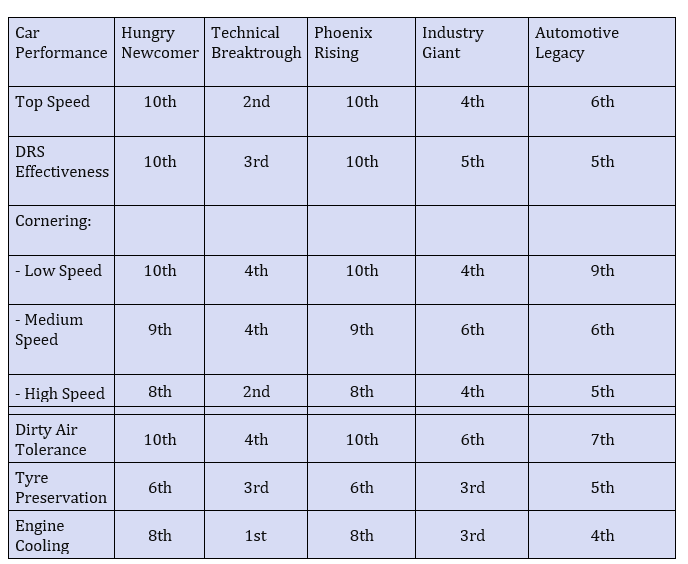
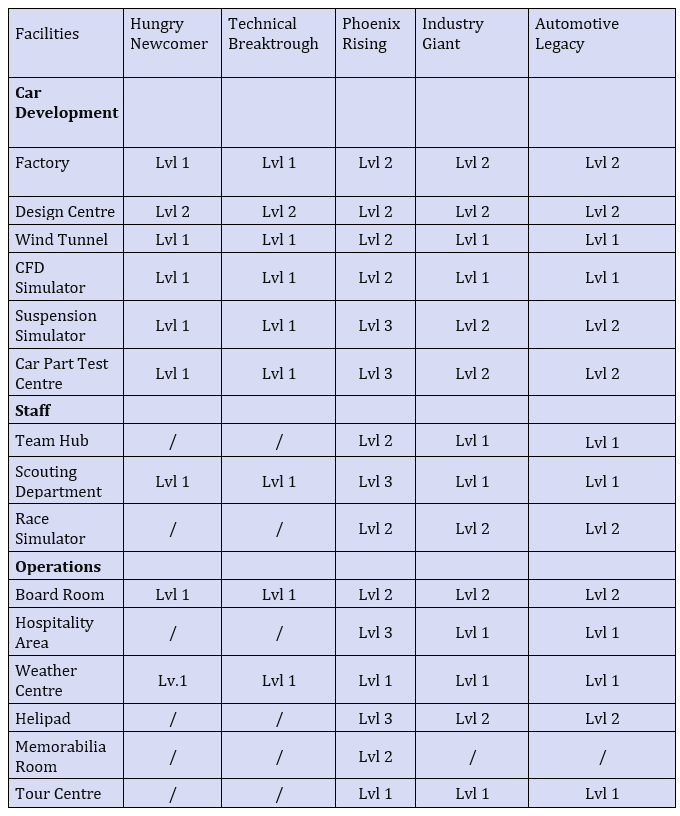
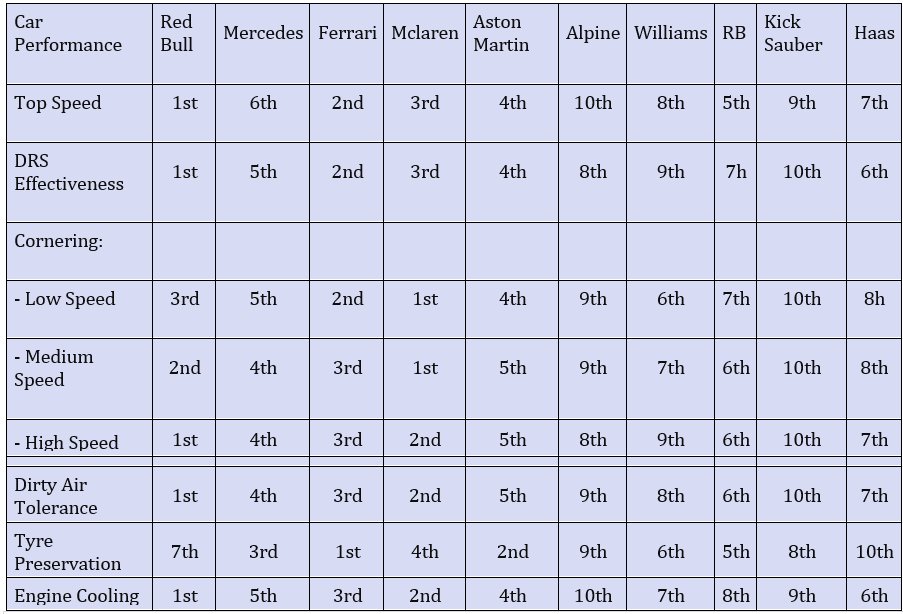
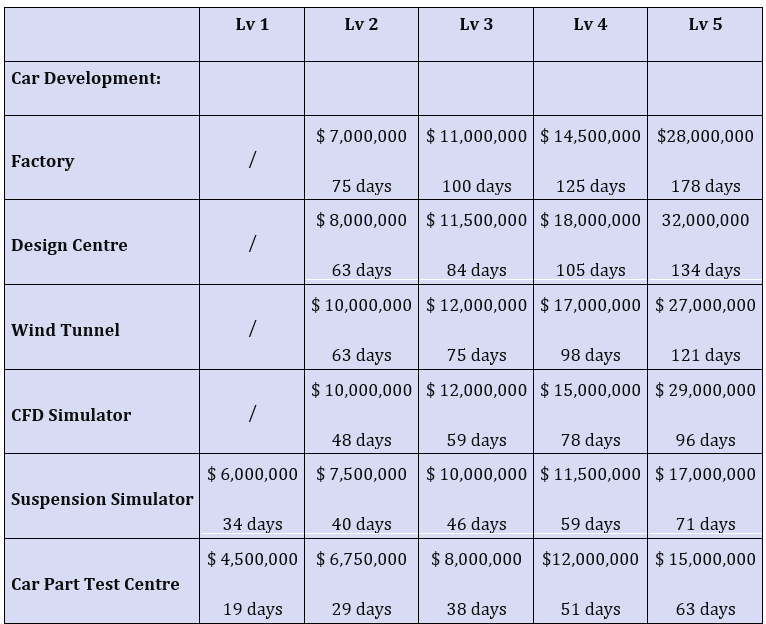
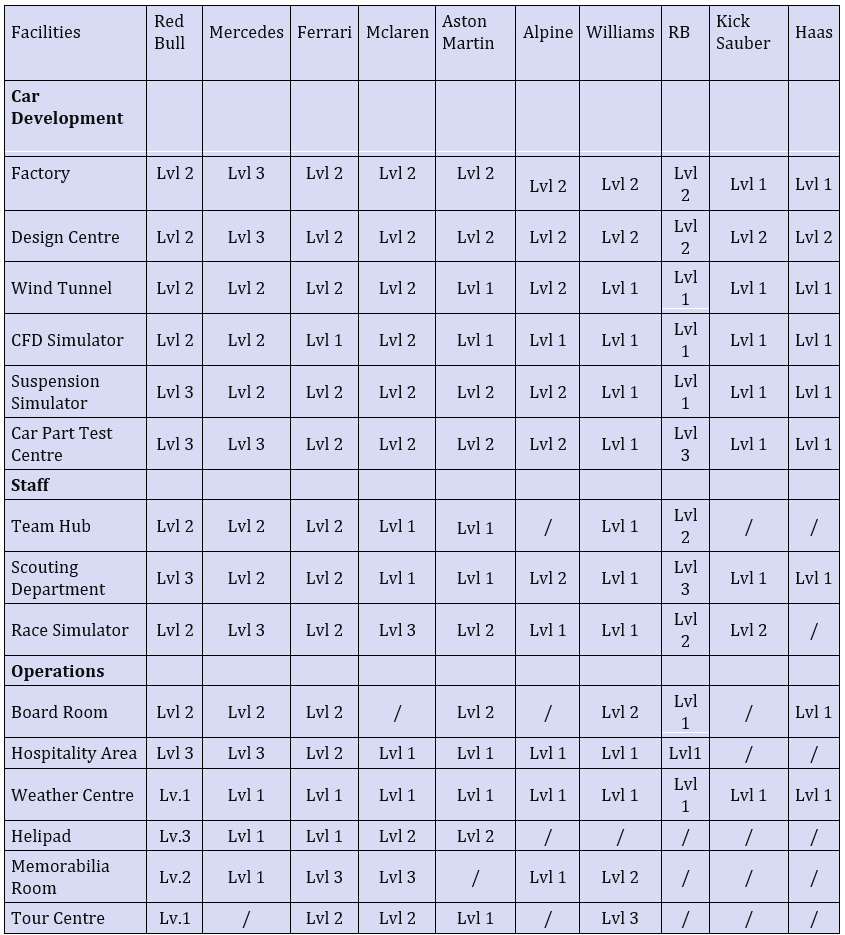
The guide consists of walkthrough and tables. The tables include every aspect of the game: stats and hiring costs of all drivers and staff of F1-F2-F3, costs and days needed to complete every facility upgrade, detailed car performance of every team, complete starter financial situation for every career and much else. These tables help you both in the career with any of the ten original team and in the six scenarios of the career with your own team.
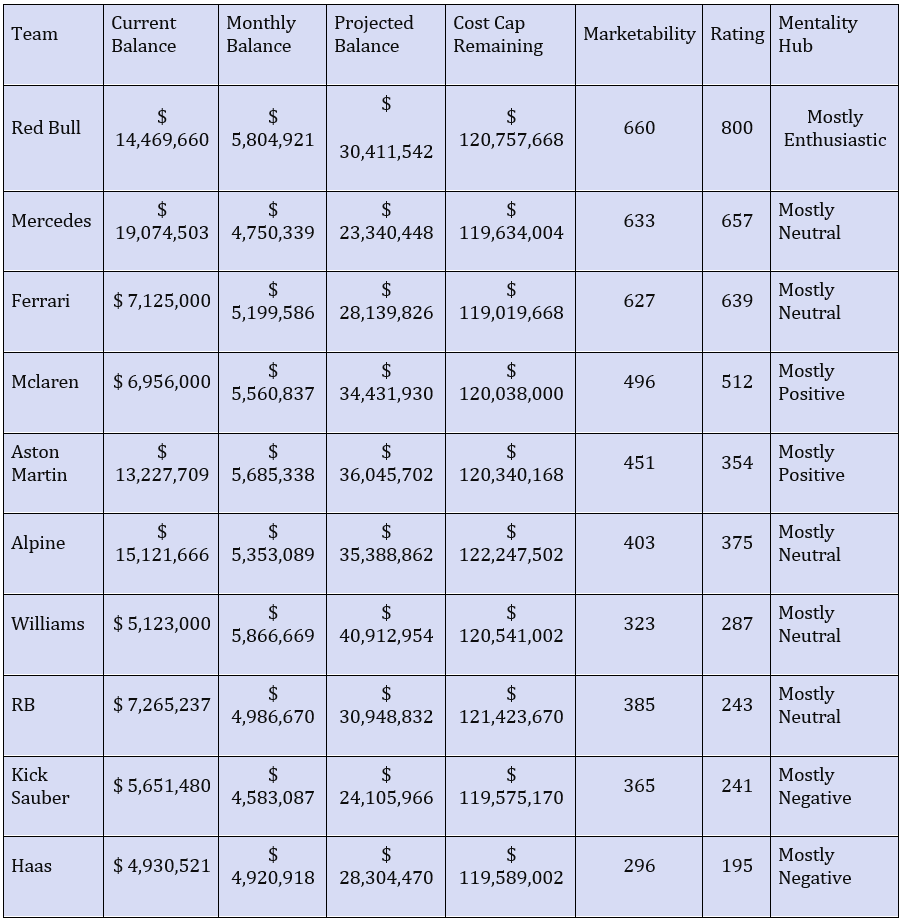
In fact in the career with a real team the tables allows you to know all stats and hiring costs of every drivers and every member of the staff without resorting to the scouting. Moreover it gives you a detailed and complete situation of every team as regard car performance, drivers and staff, facilities and financial situations, helping you to chose the best team according your gaming’s goals.
In the your own team career the tables allows to do a better choice of initial staff and drivers having available the true and complete values of stats given the fact that the overall stat often doesn’t reflects the true value of a determined staff’s member or driver. A striking example is the race engineer Bonnington that has a very high overall but all the stats are much lower than the overall. Moreover the true money that you have for the first season is much less than it appears at the very beginning of the season because there isn’t a prize money for the first season so is important to save money choosing staff and drivers more affordable and at the same time impactful.
The walkthrough provides a detailed description of some key parts of the game giving some tricks especially for the strategy of car development and manufacture, the development focus, the strategy to achieve the first place in the DHL fastest pit stop and a trick to achieve a good setup in a very easy saving-time way.
Enjoy your experience, cheers!
Car Parts Development and Manufacture
Strategy to Car Parts Development:
CFD Mau hours and Wind Tunnel hours:
The use of CFD Mau hours and Wind Tunnel hours improves the expertise of engineers around a specific part enabling them to make better pieces of that car part in the future. When you develop a new car part keep in mind that if you want develop X car parts for the month considered, Mau hours and Wind Tunnel Hours must be corresponded, for each car part, at about the total hours divided by X. For example, if you can develop 4 car parts for the month considered is recommended that you use about a quarter of total Mau hours and Wind Tunnel hours available for that month. Instead, if you want to develop 3 car parts you should use about one third of total Mau hours and Wind Tunnel hours.
Minimum Lifespan:
Minimum Lifespan is a key attribute which will affect how long the part is expected to last before it needs to be replaced. Considering that often you will build new car parts that will be better of the previous one is recommended set lifespan to about 4 races. Doing this you improve all stats of car performance and at the same time 4 races is nearly the time necessary to develop and produce a new car part better of the previous one that will replace the actual car part.
Approach:
Only for the very first design of a determinate car part, if you have enough money is recommended to use intense approach. The cost is sensibly higher but, in this way, all future projects of that determined car part will be greatly improved as stats. Rushed approach should be always avoided unless you are in trouble with car parts performance.
Numbers of engineer:
Is strongly recommended to use very available engineer for every set of car parts developed during the same period assigning more engineer to projects that requires more day to be completed. In this way engineer gains a little less experience but car parts will be ready in less time so you will be able to develop a new one early.
Strategy to manufacture:
For every car part you want to develop an improved equivalent later that will be better of the previous one, is important to produce only 4 pieces: one for the first car, one for the second car, and two as reserve (one for each car). In this way you avoid accumulating car parts that you will never use avoiding wasting money. At the same time doing this you will have more production availability to manufacture other car parts. Regarding the approach of manufactures, unless you are in trouble with car parts availability, is always better use normal approach
GP Strategies
Practices run:
To gain an optimal race acclimation and put less wear through the car components is recommended to do long stint of 20-25 laps with hard tires and lower pace mode and fuel usage. In this way you allow drivers to get used to changes of the car and gain confidence with the car itself and with the track. This is crucial to achieving better results and ensuring the team is competitive on race day. When a powertrain component is at about 60% use always it for the practice changing it for the qualifying and the race. Using always in the practice runs the powertrain components with lower percentage of consumption give you the chance to conclude the season without penalties.
Setup 100 % Method
Adjust the setup before the first practice run and between every practice run set all five bars in the centre of the blue areas. Keep in mind that:
- Front wing angle: use it to regulate especially oversteer
- Rear wing angle: use it to regulate especially on straight
- Anti roll distribution: effects on all stats
- Tyre chamber: use it to regulate traction
- Toe out: used it to regulate braking stability
With that knowledge you can easily regulate all five-setup doing as last anti roll distribution to adjust the overall situation. If you want to achieve the 100 % setup with both drivers manage the practice run waiting to receive all five feedback on the car setup by the drivers before pitting.
Qualifying
Is very important to save two new soft tyres for the race because they give you great benefit that are crucial using aggressive race strategies that giving you a competitive advantage. You can do this doing long stint during practices and performing a single run during the Q1.
Race
Start the race with aggressive pace, deploy ERS and push fuel strategies in order to maximize the impact of the start. Adjust pace to standard when the consumption of tyres is about at 90% if your strategy with those tyres isn’t not aggressive. Change the ERS strategy to neutral when the ERS reach 30 % and adjust fuel to balanced when it is about – 0,9 kg. In this way you have still the chance to put fuel aggressive during the final laps or the pitting laps ensuring at the same time the max power during the initial crucial laps.
Use the Safety Car and the Virtual Safety Car to adjust tactics and in case of red flag always make the change of tyre compound if you can. Keep an eye on weather forecast to be ready to put intermediate or wet tyres
Facilities
Car Development Facilities effects:
- Factory: development speed and the project capacity.
- Design Centre: performance of car parts, the engineer capacity and the project capacity.
- Wind Tunnel and CFD Simulator: performance of car parts per unit of testing time used.
- Suspension Simulator and Car Part Test Centre: performance of some car parts.
Staff Facilities effects:
- Team Hub: attractiveness of the team and staff’s development rate and mentality.
- Scouting Department: scouting capacity.
- Race Simulator: Driver’s development rate.
Operations Facilities effects:
- Board Room: board confidence and team attractiveness.
- Hospitality Area: team marketability and team attractiveness.
- Weather Centre: accuracy of weather forecast.
- Helipad: sponsor, team marketability and team attractiveness.
- Memorabilia Room: mentality, team marketability and team attractiveness.
- Tour Centre: team marketability and weekly income.

Development focus and DHL fastest pit-stop
Development Focus: Drivers
A good strategy is to develop for every driver his stats that represent his weakness point. Alternatively a great choice is to alternate pace (short runs) with wet track option because both them increase key stats. First of all braking and cornering give pace during cornering, control reduces the risk of an incident, accuracy reduce the chance of a driver losing time from running wide while racing, and smoothness reduces tyre wear while racing.
Development Focus: Race Engineer
If the affinity between race engineer and the paired driver is already a “great affinity” the best choice is undoubtedly choice driver comms as development option. This is because the other two options increases the affinity but you have already get the maximum outcome. If you don’t have a great affinity between race engineer and the paired driver is better develop car analysis or responsiveness according to the fact if the weakness point of the engineer is feedback (in this case the best option is car analysis) or composure (in this case the best choice is responsiveness). Both of them improves the affinity between race engineer and the paired driver.
Development Focus: Sporting Director
The ideal choice is to develop drill planning because it improves two keys aspect such as leadership and training. Leadership reduces the chance of pit-stop mistakes and training develops the skills of team mechanics.
Pit Crew and DHL fastest pit- stop strategy
In order to win the DHL fastest pit-stop competition and to be competitive in every Grand Prix the best strategy is alternate gym training and pit stop drill by ensuring the pit crew is always well-rested at the day of the race. Use cumulative menu to verify it. Gym training reduces the estimated pit stop time while pit drill reduces the chance of a mistake. Alternating them with rest, the pit crew will always well rested for the race improving all key stats. An example of efficient strategy for a given month is: 9 total days of gym training, 9 total days of rest and 3 days of stop drill.
F1 Team's Drivers Part 1
Legenda:
OVR = Overall
Cor = Cornering
Bra = Braking
Rea = Reactions
Acc = Accuracy
Con = Control
Smo = Smoothness
Ada = Adaptability
Ove = Overtaking
Def = Defending
Agg = Aggression
Mar = Marketability
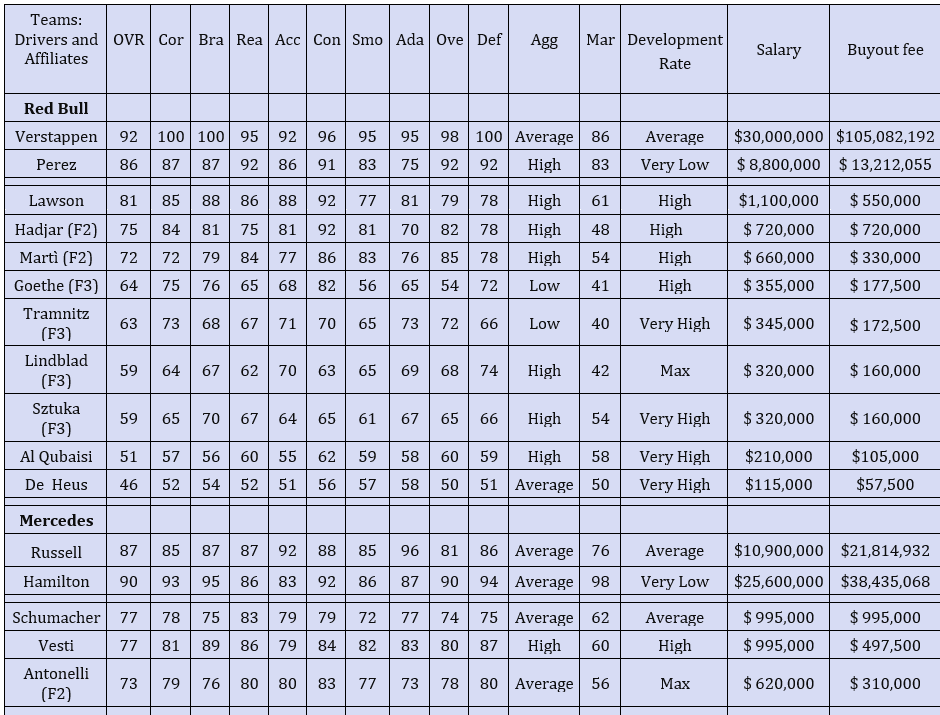
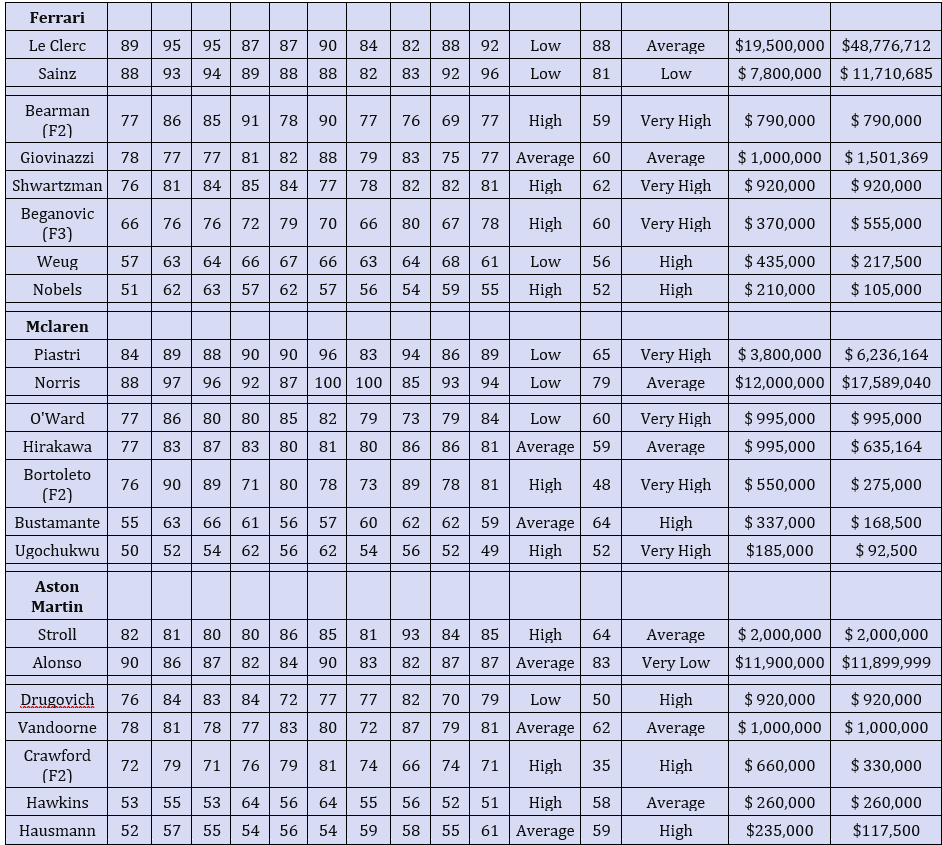
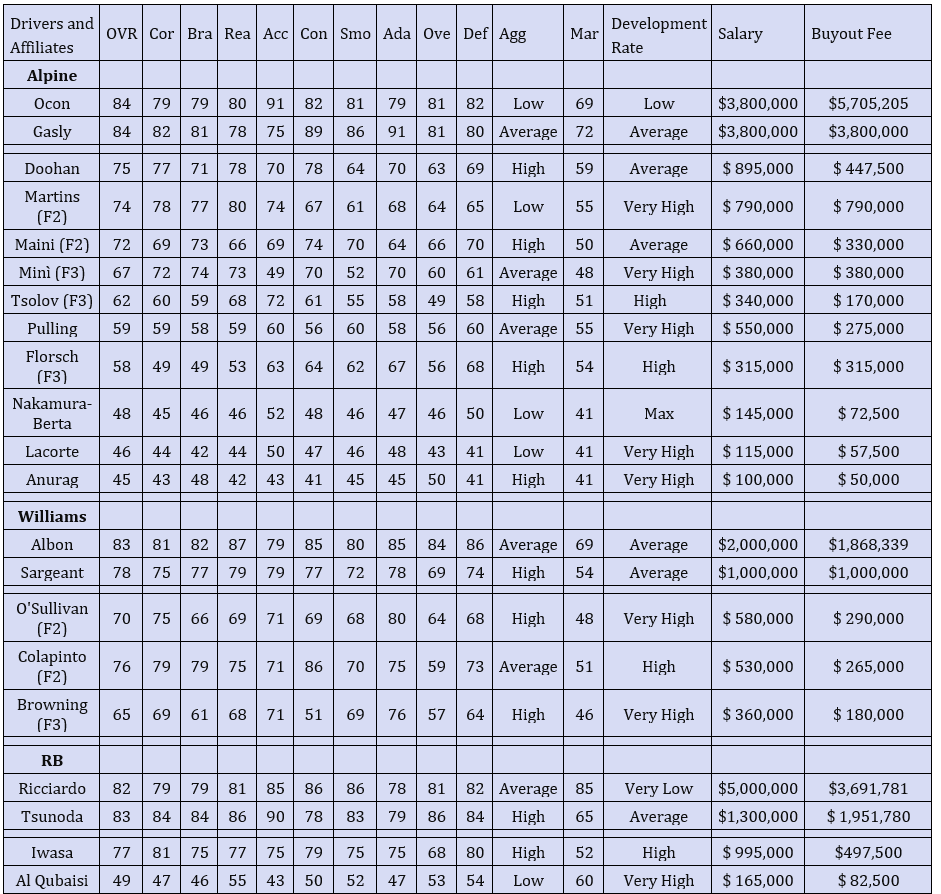
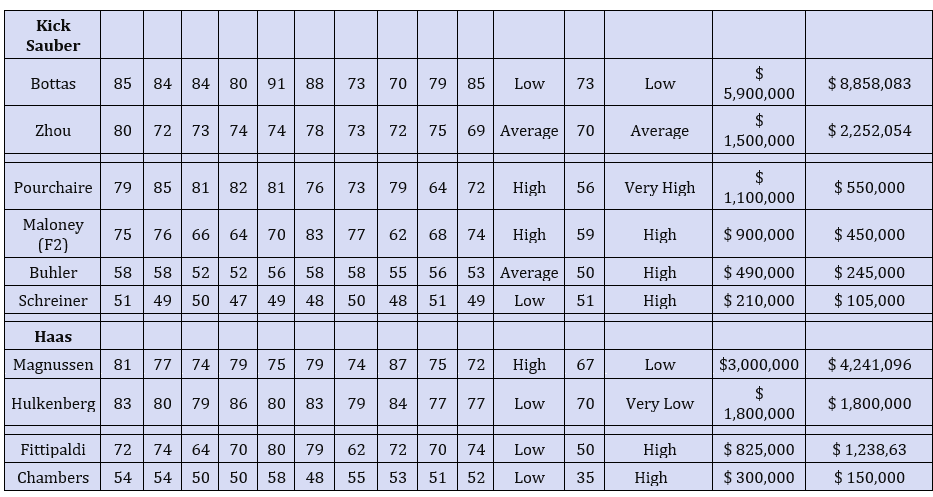
click on the img to see the full table
At the start of my team career, stats (that are influenced by moral) are slightly boosted or decreased in relation to the values of the table, according to the moral of the driver or the member of the staff. The buyout fee value changes in my team career according to the team you create.
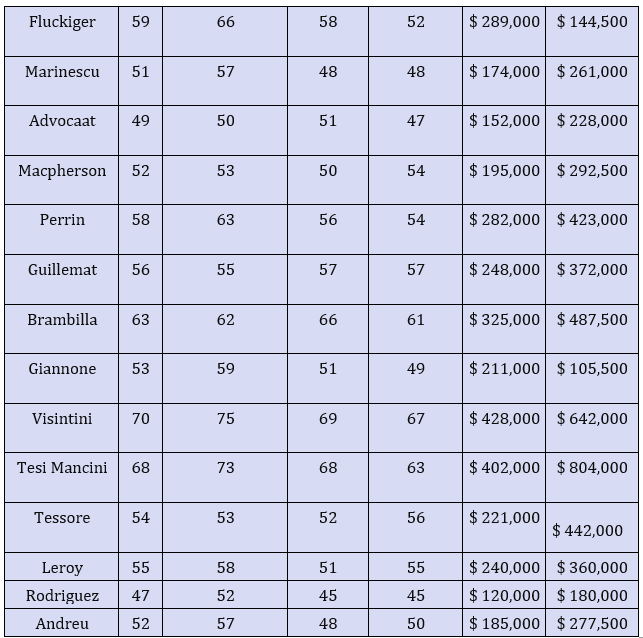
Unaffiliated Drivers
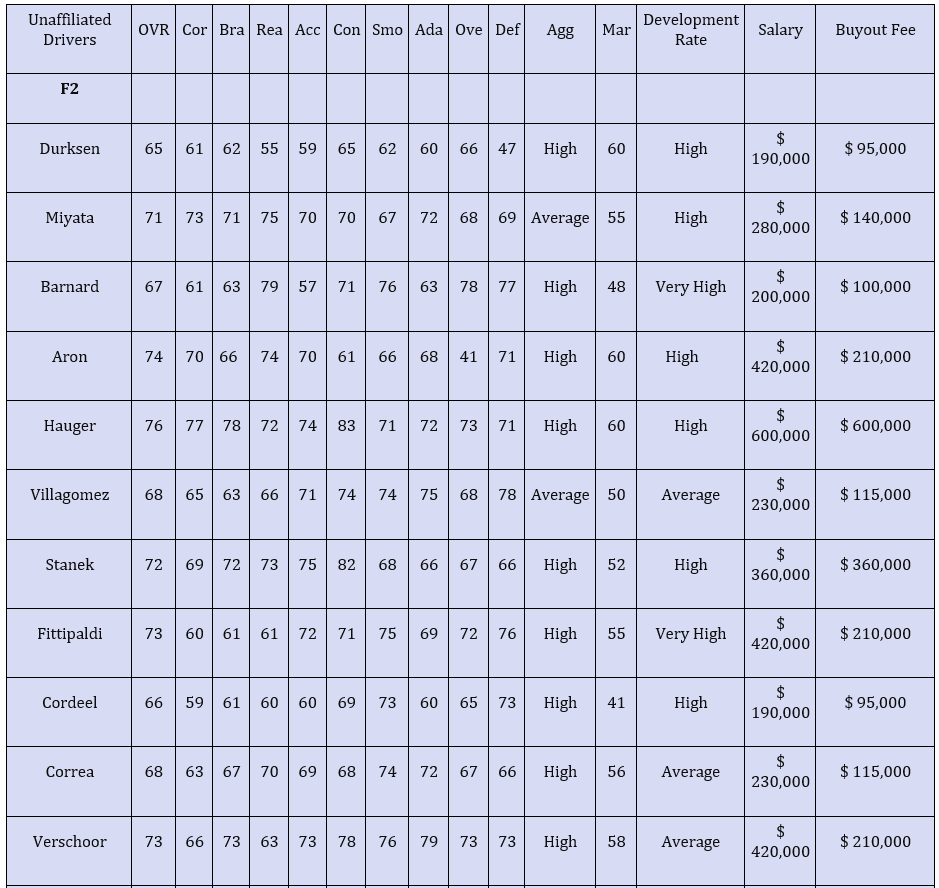
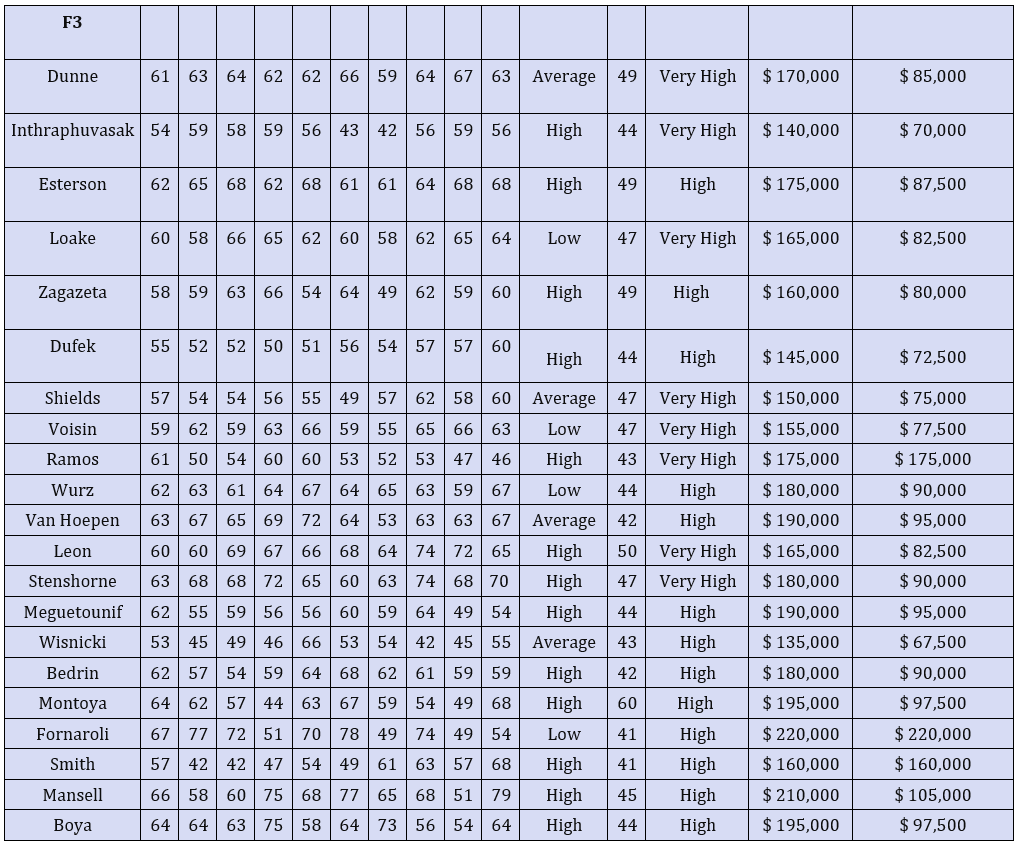
click on the img to see the full table
These performance ratings (from cornering to defending) correspond to the stats that the driver will reach when reached half season (July). At the start of my team career, stats (that are influenced by moral) are slightly boosted or decreased in relation to the values of the table, according to the moral of the driver or the member of the staff. The buyout fee value changes in my team career according to the team you create.
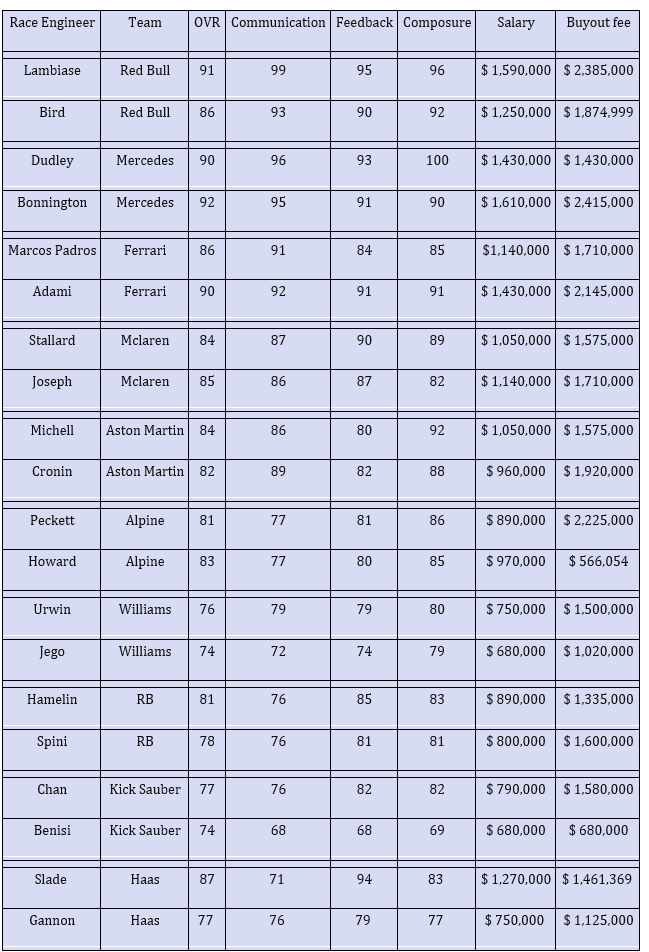
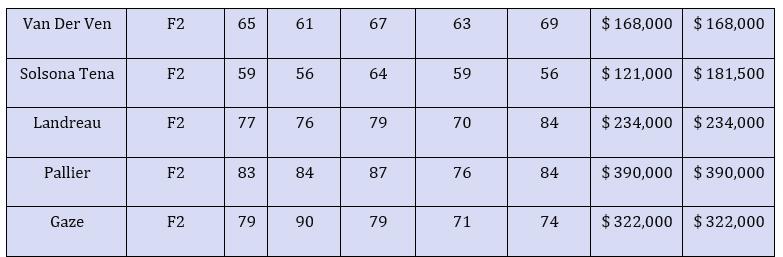
F2 Race Engineers
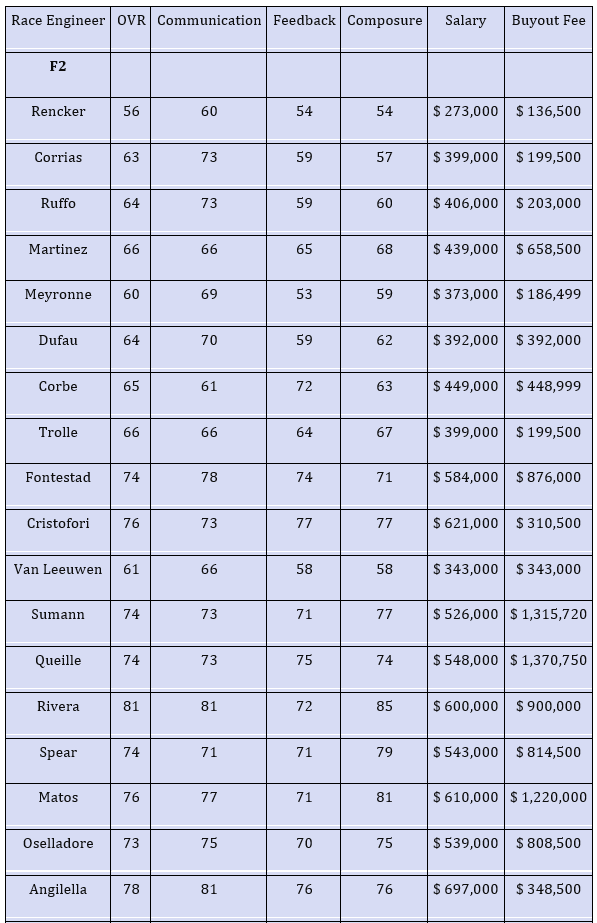

These performance ratings (communication, feedback and composure) correspond to the stats that the race engineer will reach at half season (July). At the start of my team career, stats (that are influenced by moral) are slightly boosted or decreased in relation to the values of the table, according to the moral of the driver or the member of the staff. The buyout fee value changes in my team career according to the team you create.
F3 Race Engineers
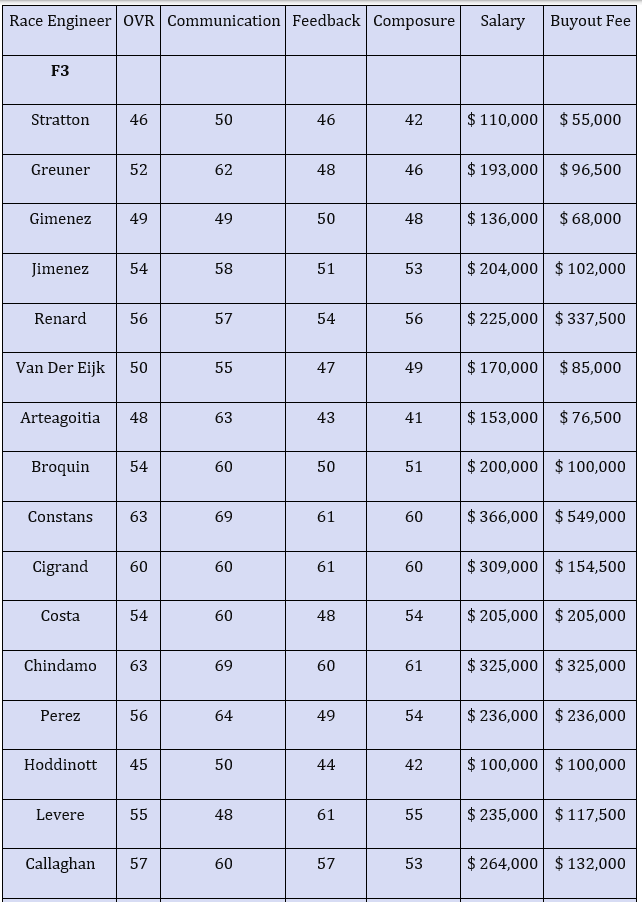
These performance ratings (communication, feedback and composure) correspond to the stats that the race engineer will reach at half season (July). At the start of my team career, stats (that are influenced by moral) are slightly boosted or decreased in relation to the values of the table, according to the moral of the driver or the member of the staff. The buyout fee value changes in my team career according to the team you create.
Technical Chief
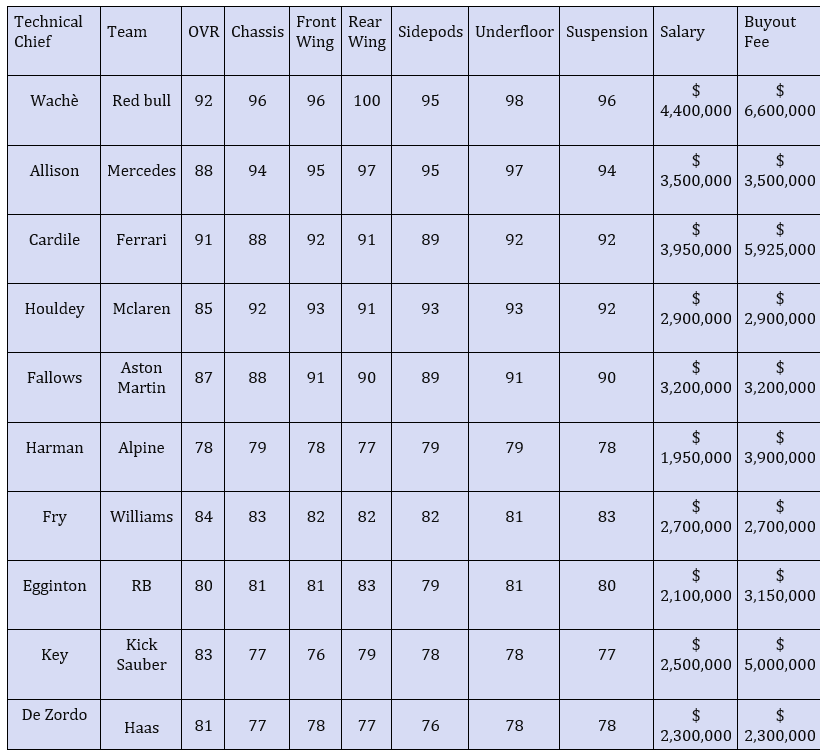
These performance ratings (communication, feedback and composure) correspond to the stats that the race engineer will reach at half season (July). At the start of my team career, stats (that are influenced by moral) are slightly boosted or decreased in relation to the values of the table, according to the moral of the driver or the member of the staff. The buyout fee value changes in my team career according to the team you create.
Heads of Aerodynamics
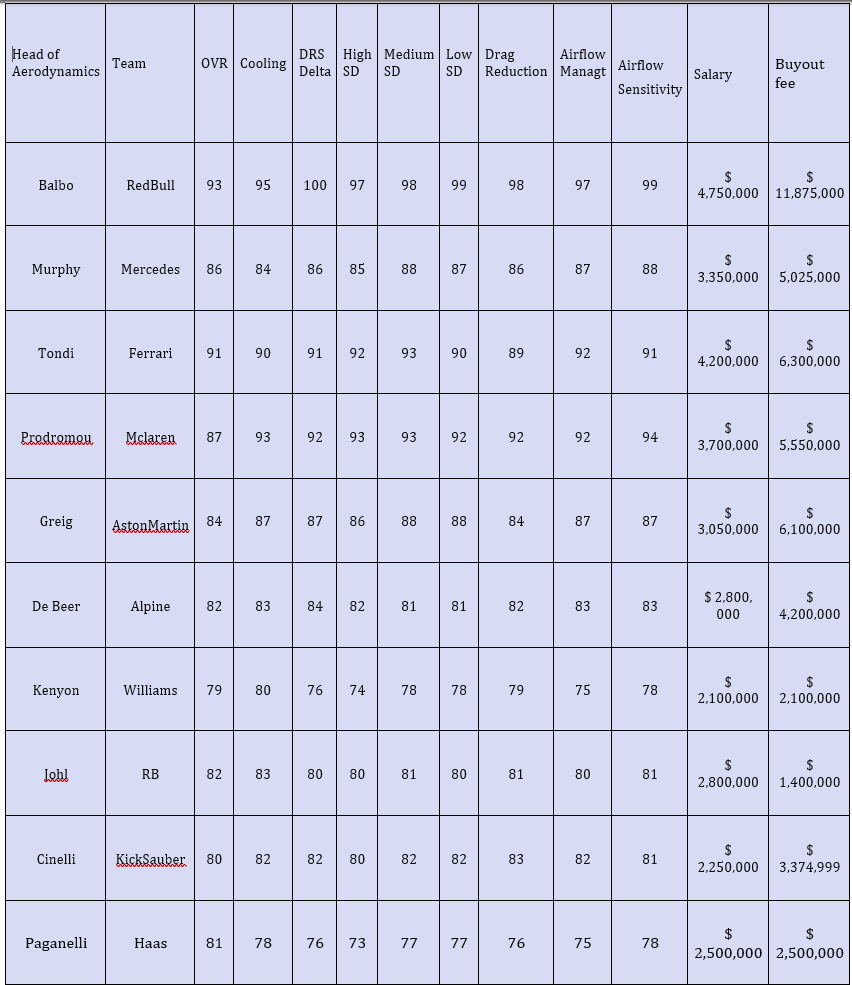
These performance ratings (communication, feedback and composure) correspond to the stats that the race engineer will reach at half season (July). At the start of my team career, stats (that are influenced by moral) are slightly boosted or decreased in relation to the values of the table, according to the moral of the driver or the member of the staff. The buyout fee value changes in my team career according to the team you create.
Sporting Directors
These performance ratings (communication, feedback and composure) correspond to the stats that the race engineer will reach at half season (July). At the start of my team career, stats (that are influenced by moral) are slightly boosted or decreased in relation to the values of the table, according to the moral of the driver or the member of the staff. The buyout fee value changes in my team career according to the team you create.